Saturday, November 10, 2012

Lactation Cookies Recipe - Increasing Milk Supply for Breastfeeding

These cookies taste super yummy and work wonders! I stopped nursing a few years ago, but was contacted with a request for the recipe I used to use!


Lactation Cookies

  • 1 Cup Butter
  • 1 Cup Sugar
  • 1 Cup firmly packed brown sugar
  • 4 tbsp. water
  • 2tbsp. flax seed meal
  • 2 eggs
  • 1 tsp vanilla
  • 2 cups flour
  • 1 tsp baking soda
  • 1tsp salt
  • 3 cups oats (steel cut old fashioned style, not quick cook)
  • 1 cup chocolate chips (Ive also used butterscotch and peanut butter!)
  • 2-4 tbsp Nutritional Brewers Yeast
  1.  Preheat Oven to 350.
  2. Mix flax seed meal and 2 tbsp water, let sit for 3-5 minutes
  3. Beat butter, sugar and brown sugar well.
  4. Add eggs & mix
  5. Add flax seed/water mix and vanilla, mix.
  6. Sift together flour, yeast, baking soda and salt
  7. Add dry ingredients to butter mixture
  8. stir in oats and chocolate chips
  9. scoop into spoon fulls onto an ungreased baking sheet and bake for 12 minutes. 
  10. Let cool before removing!

Tuesday, August 21, 2012

Our Farmhouse Kitchen Renovation: Part 1


These two pictures above are what the kitchen in our side wing downstairs looked like when we first started working on things. You can see where the cupboards were in picture 1 and the chimney and door to the main house in picture 2. Though, that's a little misleading, the door actually leads to another little hallway/entryway that is STILL technically in the side wing, with an opening into the main house (the room we currently use as a dining room). Below you can see what things looked like after the walls started getting torn down.


Here is the back corner (remember the pink walls and cupboards? Yeah, Not anymore!)

These pictures are a few years old, things have been on hold for awhile for a number of reasons, but recently have picked back up! Here are some updated shots! We gained another 6 feet or so length in the room by tearing down that wall to the right!


Here you can see we've busted through the wall (when I say "we" I mean hubby with my oh, so helpful assistance of staying out of the way) - If you look closely at the left, hanging in front of the window, that's a piece of the ORIGINAL tin ceiling (!!!!!!!!!!!!! You have NO idea how much I love that original tin ceiling!!!!) We pulled that entire section of ceiling down, and TOGETHER (yes, I put in some grunt work on that part) we hauled it outside, and then hubby, SUCCESSFULLY pulled the tin off the ceiling piece we pulled out! He salvaged it, and took it apart, without destroying ANY of it! We will be using a piece of the crown molding part to repair the tin ceiling in the room we CURRENTLY use as our kitchen, that will become our home office (the entire tin ceiling is in one piece in there except for one side the crown molding was damaged) and the rest of the panels will become a sort of "backsplash" behind our counter in the kitchen! YAY for Repurposing original materials!!!!


Here, you can see the entire right side of that wall has disappeared, no more doorway, and my new kitchen is officially about 6 feet longer than we had before! When we FINISH things, the left side of the room will have a counter that goes around the corner and a big work island just about where the chimney is... to the left we are building an addition full of windows and our dining table will go in there!

 Here you can see, the chimney and the wall are completely down... still a long way to go, but getting there!


Wednesday, August 15, 2012

New England Farmhouse Renovation Part 2: The Upstairs

If you haven't read part 1, Click here now to read it. - Also, I apologize for the crappy quality of some of these photos... the one's that are BLATANTLY out of focus, were taken by the hubby, but they are what we have, so we deal with it, lol

Ah yes, the upstairs. When you walk up the stairs in the side wing, you would find yourself in a cozy little landing with angled walls and a sloped ceilings and no windows. To your left was a small bedroom with a blue floral wallpaper pattern and a small closet. To your right, another bedroom with a chimney and a door that led to a small cramped little bathroom. In the bathroom was another door that led to the hallway of the main house.

The top of the stairs, looking down


 Taken from in the first bedroom, facing the "landing" between the 2 rooms.

This is the front wall, this window faces the road

Standing at the top of the stairs looking to the room on the right, the pink door back there behind the chimney leads to the upstairs hall of the main house.

The pictures above are the closest we have to "before" pictures, unless hubby took some before I moved in that I don't know about.

Now on to some of the progress pics! After we got all the crap pulled out...

Taken standing in front of the door to the upstairs hallway of the main house, facing the staircase. As you can see, we got all of the walls, plaster, etc. pulled out and all we have left is the wiring and some of the old insulation. The chimney you see in the right hand side of this picture is being torn down THIS WEEK so we can get started on the kitchen and framing for the two bedrooms and kids bathroom that will be going in up here!


Facing the other direction, along this front wall (on the right) will be a hallway, on the left will be 2 bedrooms (one on either end) with the stairs and a bathroom between them. The unused section of "hall"  (where I'm standing while taking the picture) will become a "Craft" nook for me!

I hope you've enjoyed this riveting look into our adventures in renovating a century old farm house! Look for another post SOON!


Tuesday, August 14, 2012

Recipe: Homemade Granola From Scratch!

With a family of six, we go through cereal, FAST. Buying cereal can cost us ridiculous amounts of money considering the fact that a box of cereal is typically gone in a day. I came across a recipe on a blog for homemade granola, and have started making my own, loosely based on that recipe.

 
Here is the basic process and TOTALLY customizable recipe! Pick your favorite nuts and favorite dried fruits (I usually pick a good trail mix and then separate the dried fruits from the nuts)


  • 2lbs of Thick cut old fashioned rolled oats (can be bought in 2lb bags or can be purchased from the bulk bins)
  • 1cup Coconut Oil (melted in a double boiler setup)
  • 2 Cups of dried fruits
  • 1/2 Cup Brown Sugar
  • 2 cups of nuts
  • 1 1/2 cups Honey or maple Syrup
  • 1 cup flaked coconut (optional)
Preheat the oven to 325. Mix the Oats with the  brown sugar, coconut oil and honey/syrup, and put in a roasting pan, put in the oven for 15 minutes and add the nuts. Put back into the oven for 30 minutes, stirring after 15 minutes.

Add the dried fruits (and keep in mind, raisins or other fruits like them will swell up as they cook) and put back into the oven for 15 minutes, stir and then bake for 15 more minutes.

Stir in the flaked coconut (if using) and bake for 5 more minutes so the coconut can toast up.

Take out of the oven and let cool (stirring occasionally to help it cool faster) and once it has cooled down, store in an air tight container in a cool cupboard!

Monday, August 13, 2012

New England Farmhouse Renovation- Part 1: The Kitchen

February 2012
5 years ago this week, my 3 oldest children and I, embarked on one of the biggest adventures of our lives. We packed up all of our belongings, and moved in with my boyfriend (who is now my husband and there are now 4 kids!). The outside of the house looked a bit nicer than this when we first moved in, at least, it was all put together still. There used to be a porch on the front of that side wing on the left.

Right now, we only live in the Main house (the big part on the right). You walk in the front door and you are in the main hall, the main staircase is directly in front of you, to the right is a door to the living room, straight ahead is our current Dining room (can also be accessed through another door in the living room - to create a big circle) and in the very back corner is a tiny little room that we are currently using for our kitchen. The original kitchen to this house was in the side wing, just behind those 2 windows on the lower floor.

When you first walk in that door, farthest to the left (and this picture does NOT show the entire side wing, there's another window upstairs and down to the left that you can't see) you would be at the bottom of the "utility" stairs, to your left would be the Laundry and Mud entry, to the right was the kitchen.

Here's the Mud Entry and Laundry closet:
 "Mud entry" to the left of the main door. The white door leads to the garage, just to the right of that door is a TINY little corridor that was the "laundry" - Shown below:

The Laundry nook....


Here's an idea of what the kitchen USED to KINDA look like, after we started on the renovation adventure.

 When you first walk in the door and look right, into the "kitchen" this is what you saw, that door leads to the Main house
 Look toward the back corner and you can see where the cupboards used to be, that's the old counter top and lots and lots of tools and stuff
If you had continued through the mess and found your way in to the half bath behind the staircase you could look back into the "kitchen" and see this (to the right is the basement stairs, behind is the half bath)


I know this is a LOT to take in, so I'll leave it at this for now, and post more in a few days, maybe with some updated shots!

Recipe: Bean, Rice & Chicken Tacos on Homemade Flour Tortillas

We LOVE homemade Mexican food in our house, like we eat it any chance we get.

Yesterday our plan for dinner had been to have Crockpot Orange Chicken on rice, but we had to run some errands, and bake some bread, and by the time we got home, it was too late to start the chicken, so we had to go and find something else for dinner.

I had picked up some Avacados and some Fronteras Guacamole Mix (Frontera brand makes some of the BEST - CRAP FREE mixes!) which helped me decide to come up with a Mexican inspired meal.

I've been wanting to try homemade flour tortillas, so figured since hubby already had the kitchen covered in flour from baking bread, we might as well give it a shot!

He worked the dough, I cooked the tortillas, it was a beautiful pairing - However, I SO can't wait for our new kitchen to be done (I've got some pics of progress to post on that, speaking of which), the current temporary kitchen has FAR too little room.

The tortillas were surprisingly simple (however the tortillas we got by following the original recipe were too small so here is our modified version for larger tortillas!)

Flour Tortilla Recipe
  • 3 cups of flour
  • 1 tsp. salt
  • 1/3 cup vegetable oil
  • 1 cup warm water 

Combine everything and mix until it forms a dough.

Roll the dough into a big ball on a floured surface and separate into 2-3 inch balls. Let the balls of dough rest for 30 minutes. After the dough has rested flatten each ball with your hands and then roll into thin circles. In the meantime, heat a flat non-stick skillet on the stove top at med-high temp (it will be ready when you sprinkle water on it and the water instantly bubbles and sputters and evaporates).  When  the pan is ready, cook the flattened dough one or two at a time (depending on the size of your skillet). Use a flat spatula to flatten the air bubbles in the tortillas as they cook. Flip when the bottom starts to form slightly brown spots. Cook until the 2nd side has similar brown spots. Try not to overcook so the tortillas don't turn hard, but don't worry too much, they are pretty hard to screw up!

Since the meal wasn't planned out ahead of time, we had to come up with a plan for a filling, so we threw together some rice, beans and chicken with some homemade taco seasoning. (Note: This would have been TONS better if we'd had Cilantro to top things with, but we were out)

Bean, Rice & Chicken Taco Filling

  • 1 Cup brown rice (dry measure) - Cooked according to package
  • 1 Can black beans - or beans of your choice (or 1/4 cup dry beans, cooked according to package)
  • 1 Package Organic Chicken Tenders - cut into cubes
  • 1 Onion - chopped
  • 2 Minced Garlic Cloves (or a teaspoon of pre-minced garlic)
  • Chili Powder
  • Cumin
  • Celery Salt
  • Olive Oil

Put a splash of olive oil into a frying pan (roughly 2 or 3 tablespoons), add the chopped onion and garlic and cook until the onion becomes transparent. Add the chicken and cook through.

Add seasonings to taste (roughly 1 or 2 teaspoons each of Chili Powder and Cumin, 1/2 tsp. celery salt), stir until chicken is thoroughly coated. Add beans and rice, stir to mix. Add more seasonings until it reaches your desired flavor intensity (for spicier food add some crushed red pepper - My kids can only handle so much flavor, so those types of dishes are reserved for date nights when it's just the hubster and me).

Serve with a side of guacamole and chips or salad!

(I linked to this post over at Mostly Homemade Mondays on Frugal By Choice, Cheap by Necessity!)


*Full Disclosure: this post contains affiliate links and should you choose to purchase anything featured in any links in this post, I will receive a small credit for sending you - However, any companies mentioned above are in no way compensating me for posting my honest opinions here.

Tuesday, August 7, 2012

When Disgruntled Appliances Attack

So this week I've been working on my new schedule/routine. I really hate the word Schedule, seems too FORMAL. I'll be posting about that as a Guest Post over on Small Business Success later this week or early next week, so look for that there... Anyway, back to the routine stuff... Part of my new routine, is to work on Meal Planning, so yesterday I went through the pantry, fridge and freezer to see what we had and then headed over to Pinterest to see what I could do with it. I found some great new recipes and today's dinner is supposed to be Slow Cooker Cilantro Lime Pork Roast from I Believe I Can Fry, which I had started to marinade last night and had to sear and put into the crock pot this morning.

So I've got pork in the frying pan, the bowl with the marinade on the counter beside me, and I'm reheating my coffee in the tea kettle on the back burner (we use a french press coffee maker and I got up late this morning so MY half was cold). The pork gets done, coffee is finishing up, I reach up onto the shelf above the stove, where we keep miscellaneous appliances and gadgets, to grab my crock pot (you see where this is going yet?), and as I'm pulling the crock pot down, it's caught up in a casserole dish and catches onto the edge of our old deep fryer.

We haven't used said deep fryer in about a year because we were given a bigger and more functional one, so this one (that used to be used Oh so frequently) has literally been sitting up on the shelf, collecting dust... feeling lonely, probably hoping and praying each time we reached up there that we would grab onto it's handle and lovingly pull it down, wipe the dust off, apologize for neglecting it for so long, and, well, you see where I'm going with that...

Anyway, the deep fryer apparently decided that since we have neglected it for so long, revenge is in order. The fryer comes FLYING down AT ME, and APPARENTLY the genius that put it up there, neglected to remove the last batch of oil that was used.... a YEAR ago... I wonder who that was?

So yeah, 1 year old, used, probably rancid cooking oil comes FLYING out of the deep fryer... Luckily for me and my cat-like reflexes (Guffaw!) I was able to jump back and out of the way of the airborne oil particles. It DID however get ALL over my kitchen, stove, counters, pots and pans, WINDOW and floor.... did I mention we have CARPET in the kitchen? (Eh, don't forget, we are in the middle of renovating this century old farmhouse, lol, its an old scrap of carpet laid down to help insulate us from the basement because we have no actual floor boards lol)

And GUESS whose name is on KITCHEN duty according to the Family Chore Chart this week? You guessed it... Momma. *Sigh*

On a more positive note... guess which disgruntled kitchen appliance will be getting cleaned up and then finding its way to the Yard Sale box? ;)

Wednesday, August 1, 2012

Cleaning Microfiber Furniture

Hubby and I have been struggling for months with back pain issues and severe migraines (the kind that keep you laid up and unable to move for 3 or 4 weeks at a time). We finally went to the Chiropractor, and the man is a genius, we both started feeling better almost immediately. Unfortunately, our issues keep returning, and it wasn't long to pinpoint the cause... our furniture.

A number of years before hubby and I got together, he purchased some second hand furniture. It's really nice looking stuff, but an overstuffed couch and chair that have been used for a good decade and a half at least, tend to lose their ability to effectively support a person, especially when there are four rowdy kids and a dog who enjoy said furniture.

Having a tight budget, we knew our options were limited. We were desperate, so we checked one of those rent-to-own places that we've frequently purchased items through. We only go if we know we can pay items off in the first 90 days, so we don't have to pay the insane interest amounts. Unfortunately, there's no way we could afford to pay off a new living room set in 90 days, not if we expected to still have lights and water during that time.


We gave up for a bit and put the idea into the backs of our minds, tried repairing the old furniture, and that helped for a few days, but it wasn't long before the repairs came undone and we were in pain again.

A friend of mine posted on FB about some great finds she got through Craigslist, and it inspired me to check there for some furniture. I emailed a number of places and the set that we loved the most (a gorgeous corner sectional and two La-Z-Boy recliners) was still available, and when hubby called, he was able to talk them down a bit on the price! We drove about 3 1/2 hours one way to get this furniture (after spending the entire morning at my Grandmother's funeral and then reminiscing at the family farm) and didn't get home until midnight. The furniture wound up staying in the trailer overnight with just a tarp on, and it rained during the night. We knew the furniture needed a cleaning to begin with, and being micro-fiber (the polyester material that feels like Suede) we knew it wouldn't be easy.

Fortunately for me, I've been finding lots of Do It Yourself tips online lately and had recently read how to clean this type of furniture!
It was actually pretty easy.

What you need:
  • A white cloth
  • Rubbing alcohol
  • Spray bottle

I got lucky and my spray bottle top fit right onto my rubbing alcohol bottle so I could spray directly from the bottle to the furniture.

Spray down one section of furniture at a time and rub with the white cloth/sponge, it will become disgusting in a matter of minutes, but works amazingly.  Scrub one section at a time and then let it dry. Rubbing Alcohol dries faster than water and doesn't leave water marks on the furniture.

Check out these AFTER photos!


The furniture doesn't feel quite as SOFT after, so once it dries you can use a CLEAN white scrub brush and bush over the furniture to fluff it back up!

Tuesday, July 31, 2012

Recipe: Homemade Iced Tea Lemonade - Best Ever

When I gave up drinking Soda, in search of a healthier lifestyle, I was lost on what to drink. I know water is the best choice, I'm not a milk or juice drinker, and since soda was out of the question, I had to come up with SOMETHING. I opted for Iced Tea. Not the kind you buy at the store that's full of that HFCS and other crap no one can pronounce either. Homemade, 100% natural ICED TEA... with LEMON.


It started out as just plain iced tea with some sugar, and I was hardly impressed. After making a jug of homemade lemonade I decided to mix the two and Homemade Iced Tea Lemonade (my own version of Half and Half) was born.


Best Ever Iced Tea Lemonade
Ingredients:
1 Gallon hot water
10 Standard sized Tea bags (we usually use orange pekoe) 
 2/3 cup Sugar
1 cup Real Lemon Juice


Start by putting your 10 tea bags into your gallon of water

Let set for a few hours (I try to let mine set overnight, but 1 hour will suffice for decent tea)


Add your 2/3 cup of sugar

and then your 1 cup of Lemon Juice


Mix together well, serve immediately with ice or refrigerate until chilled first!

Family Chore List (Printables!)

Chores are a big struggle in our family. We have 6 people living in a pretty cramped space, and the brunt of the housework has been left to Mom and Dad. I've never understood how it is fair for four kids to TRASH a place, just to turn around and expect the two people who work all day to make sure that they have food to eat and a roof over their heads to also pick up after them. No way kiddos!

We've tried a variety of chore charts in the past, sometimes they work for a bit, sometimes they don't work at all. Boredom seems to be the biggest culprit for the ones that work for awhile and then stop working, so I devised this plan for a chore chart that rotates the tasks so that each person in the family has responsibilities in ONE room for ONE week and the next week they move onto something different.

Obviously, you may need to tweak this to suit your own family's needs, but it's highly flexible.

I started by creating colored slips of paper with the names of each family member on them (I cut an index card into 5 slips because only 5 of our family members are big enough to participate in actual chores right now - Colored them with a light colored marker and wrote names in black)


Then I worked on cutting the lists in half (they print two lists per page, landscape format)


After cutting the lists apart, I positioned them on an old cork board that we had laying around unused, I attached them with some push pins and then randomly assigned everyone to a room, as seen below:


I didn't add my youngest to the chore chart, though after speaking with hubby this evening, agreed that she should be added as a "helper" to someone else. These lists are formatted so that there are three DAILY tasks, to be done... every day... and then one task for each day of the week that is a "weekly" task. Each person's name will rotate clockwise to a different list on Sunday evening/Monday Morning to the next room list and they will work on that list through the week. The youngest, when she's added will go with someone else and her name will more COUNTER-clockwise, that way she is working in a different room and with a different person each week, to help her learn how to do the tasks as she get's older.


As the house gets bigger and SHE gets bigger, other rooms/areas will be added to the list and she will get her own list to do.


For families that are bigger, you could double up people in rooms (perhaps highlight jobs in different colors so one person does half and the other does half?) or if your family is smaller, double up the lists, so each person does two rooms or something similar.


This works well for our family!


Just print the lists (takes 3 sheets of printer paper) and cut them in half. Then create your name markers and set your board up! Click here to purchase your copy of the printable lists for just $0.99!


Monday, May 21, 2012

Good Reads

© Kapp | Stock Free Images & Dreamstime Stock Photos
So, I was on Facebook last night, scrolling through the list of my friends updates and looking up parks that hubby and oldest son were reading about so we can plan out our camping trip, when Chris, over at Wicked Awesomology, (who also happens to have been both my 4th and 5th grade teacher!) posted a link to his latest post about a road trip he took through our state this weekend. Always up to read something he's written, and get ideas for places in Maine to visit, I clicked over... After reading yet ANOTHER great post from him, I happened to notice on his sidebar, a list of books he was reading and some he had currently read. Ask anyone who knows me, and they'll tell you that in my "abundance" of free time, if I'm not on the computer, I'm probably curled up with my nose in a book (that's how I spent most of Friday and Sunday in fact!), so I clicked through and got hooked!

I spent about 3 hours rating books that I've read (and wow, it didn't even come close to touching how many I actually HAVE read), and adding books to my "To-Read" list. This morning I found more, and actually went onto Amazon and bought 2 books that I'm now anxiously awaiting the arrival of. I was so excited to read about these books that I didn't even cash in my Swagbucks and wait for a gift card to arrive, I actually paid cash!

The two books that I ordered are: Against Medical Advice and Med Head: My Knock-down, Drag-out, Drugged-up Battle with My Brain - The first is a book about 5 year old Cory Friedman waking up with tics and eventually being diagnosed with Tourette's syndrome and Obsessive Compulsive Disorder, the struggles that go along with finding the right doctors and treatment and the heartache of his family dealing with this.

The second book is about the personal struggles this boy went through as a teenager, struggling with his disorders.

I have read one other book called Ryan: A Mother's Story of Her Hyperactive/Tourette Syndrome Child that was a personal story of a boy living with Tourette's Syndrome, his was caused by his ADHD medications, it was an amazing book, I'd recommend it to anyone who is struggling with a family member who has been diagnosed (or is suspected to have) Tourette's Syndrome.
 
You can find me on Good Reads at http://www.goodreads.com/user/show/9659853-j or check out my widget on the right of the books I'm reading! I'll be working on adding more books I've read and reviews as I am able to!

Full disclosure: If you click on any of the links that go to Amazon.com above and purchase any of the items I posted, I'll get a tiny reward for sending you their way, I'm all about saving money though so if you can find it cheaper somewhere else,  more power to ya! If you sign up for Swagbucks through my link, I'll be rewarded for introducing you to the site!

Sunday, May 13, 2012

I'm on Facebook!

No, really... Most of you already knew that, but I have a fan page for my blog now so you can share me with your friends and they don't have to get all up in my personal business to interact with me! YAY!

Find me at https://www.facebook.com/pages/Soapin-Mama-in-Maine/333470970056945

Wednesday, May 9, 2012

Recipe: Oven French Toast Sticks

 My mother got married a few weeks ago, and we got sent home with about 8 bags of finger rolls that weren't used for sandwiches at the reception. I had NO idea what we were going to do with ALL those finger rolls, but creativity struck and I came up with the idea of French Toast Sticks! I froze them until I had a chance to do it. The kids are off school today and it's rainy and dreary so I figured this was a great day to try it out! Here's what I did:


Cut finger rolls into 3 slices and then slice each in half (each finger roll should make 6 sticks)


Place on greased cookie sheet, brush with olive oil, put in oven at 350 to toast (I turned the oven on, and put them in the oven until the buzzer to tell me the oven was preheated went off... should be dry to the touch, not browned, second batch took about 6 minutes)


Mix 3 eggs with about 2 tablespoons of Cinnamon/Sugar mix (Leftover from Monkey Bread Muffins)


Dip toasted finger roll sticks into egg mixture until coated
to your desired consistency and place single layer on cookie sheet. Make sure sticks are not touching.

Bake at 350 for 5 minutes and then flip
Bake for 5 more minutes


Serve with your favorite topping!


These would have been better, in my opinion, with REAL Maple Syrup, but we are out, so I drizzled them with Clover Honey instead. The kids loved them, and they made a yummy snack for me!

Springtime Crazy!

Tomatoes and Pepper plants
I apologize for the lack of posts for the last month, it's been kind of hectic around here.

My mother got married a few weeks ago, and the little one had a birthday (she's THREE!), after that I got hit with a bunch of orders, and then my back went out and triggered a massive flare up of Sciatica that had me in pain for more than a week and unable to do much of anything.... And then when I started feeling better, the sun finally came out and I've been obsessed with gardening, lol. That was my month in a nutshell!

So, onto the gardening!

Hubby and I have had this grand plan, every year, for the last 4 or 5 years, that we are going to start growing as much of our own food as possible. It hasn't worked yet.

This year, I'm not working outside of the home, so I'm here to actually DO SOMETHING with the garden!

Back a few months ago we ordered an awesome seed kit from Baker Creek, a huge variety of seeds, specifically picked to grow in Northern Climates (YAY!), and ordered the book All New Square Foot Gardening by Mel Bartholomew. We had come across his website a few years ago, and liked the idea of this method, but never really did much research into it and it fell to the backs of our minds.

We've had the book for a couple months now, but hadn't read it. Hubby put together some garden beds, and we bought a few loads of a Loam/Compost/Vermiculite mix from a local farm and put that in a couple of the beds. Then I read the book. So we aren't using "Mel's Mix" like the book calls for, but it should still be a good start!

I started by planting some Lettuce that we had been growing inside. Some of it survived being harvested and then transplanted a day later and is coming back with new leaves, some of it didn't make it. I also started some seeds in the ground, other types of lettuce and greens (Oriental greens, swiss chard, etc).

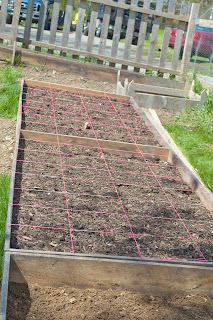
That was about 2 weeks ago. This weekend I worked on transplanting Cauliflower and Broccoli and getting the grids up on the beds. Unfortunately, I ran out of string, so had to eyeball a few of the transplants. I came across a really good idea for planting Radishes and Scallions in the 1 foot grid lines, so maybe hubby can have his string back!

After I did all that and got the cauliflower and broccoli planted I was exhausted, so I relaxed the rest of the night. The next day I transplanted the rest of our seedlings (except the onions, those are coming due this weekend). I'll post a list at the end of this with the count of what I planted, it's kinda crazy lol

So here are the pictures:

Our "Three Sisters" bed (ONE of the two we will have) Corn and Beans/Peas in the center 2 rows and different types of Squash in the outer two rows

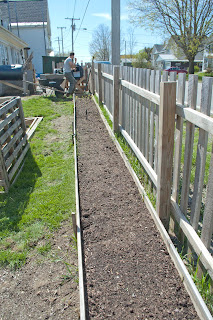
At the far end you see Hubby, next to him is where our lettuce is planted. This was taken before the picture at the top, as you can see from the top picture our tomatoes are now along the fence with peppers and eggplant in front of them

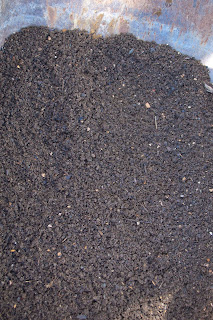
Our first time using "home grown" compost! Had to sift out some uncomposted materials, but found some useable!

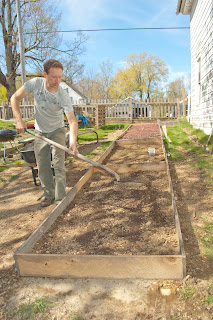
Adding the compost to the soil (we didn't buy a mix for these 2 beds, they were an afterthought and we were broke haha)

Cauliflower in the top 6 rows, then Broccoli in the bottom 2 (and in 4 rows of the next box that you can't see)


As for the final tally, I sat down yesterday and figured out exactly how much I have planted, here we go:


I currently have 2 areas of the yard with garden beds, one bed is 64 square feet, it runs along our front fence (2 feet deep by 32 long) and another that is 4 sections that are 8x4 for a total of 192 square feet..... 
This is what I currently have planted:
  1. 144 corn seeds (80 more will be planted this weekend in a new bed that will 10x4 feet and will also include more beans and squash/Pumpkins) 
  2. 16 Zucchini plants
  3. 8 Japanese Cucumber plants
  4. 8 Winter Squash
  5. 8 each of 3 types of beans
  6. 8 sugar peas
  7. 24 Cauliflower and 24 Broccoli plants
  8. Lettuce and other greens
  9. 8 varieties of tomatoes, up to 12 plants of each type (Nearly 100 plants total by my count)
  10. 24 each of 2 varieties of garden peppers
  11. 12 each of two types of hot peppers
  12. 6 each of 2 varieties of eggplant
I also have 4 rows of 4 squares that are left empty, originally waiting for peat moss (at hubby's request) so I could plant 2 types each of carrots and radishes, but now I'm thinking of doing those in place of the grid lines, so I'll have those 4 rows for something else!

I also planted 13 Sunflower seeds. Hubby and I ordered more Corn, some Jack O Lantern pumpkin seeds and some Buttercup squash. Fast producing varieties because we have to have them shipped and our growing season is short anyway... All of our seed varieties are Heirloom seeds and we also ordered a book on Saving seeds called Seed to Seed: Seed Saving and Growing Techniques for Vegetable Gardeners so the $110 we've currently got invested in seeds will HOPEFULLY be a one time investment!
 I'll post more pictures as things progress, and try to get a big picture view of the whole garden area so you can get a really good idea of the layout, it's hard to tell from the pictures I've got!
 
Full disclosure: If you click on any of the links that go to Amazon.com above and purchase any of the items I posted, I'll get a tiny reward for sending you their way, I'm all about saving money though so if you can find it cheaper somewhere else,  more power to ya!